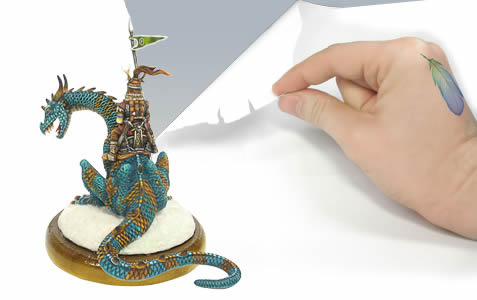
It takes two steps to isolate objects:
1. Select the object
2. Isolate the object, i.e. deleting the background
As always, there are several roads leading to Rome. For both steps exist more than one solution. But the most obvious isn't always the best. By choosing the right means the result can be improved significantly.
Especially the first step - selecting the object - is most important for the quality of the result. And especially for this first step there is a always quick & dirty way (e.g. the popular "magic wand tool" ), though this often fails with tricky subjects. And even if the result seems quite ok at a first glance, there will be almost for sure some flaws if you take a closer look. However, the wand can be the method of choice, if the result doesn't need to be perfect, but shall be reached quickly. A manual method on the one hand guarantees a more accurate selection, but on the other hand can be quite time-consuming. No matter which method is chosen, with a so-called non-destructive isolation of the object, the quality of the result can be significantly improved and possible flaws of the selection can be corrected afterwards. But let's start with the selection.
A good selection is half the battle
Automatic/Semi-automatic Selection
Common methods are the Magic Wand Tool, the Magnetic Lasso Tool, the Polygonal Lasso Tool, the selection of a certain color range ("Select" > "Color Range...") or the simple Lasso Tool for freehand selections.
The magic wand, which selects areas of similar colors, ist perhaps the most popular among those.
Usually the subject can be selected quite exactly with the appropriate settings especially if the picture has been shot in front of a neutral background like plain white. Select the monochrome background and invert the selection ("Select" > "Invert" or Shift+Ctrl+i). The accuracy of the selection can be improved by lowering the tolerance 
and then enlarge (Shift + Click) or reduce (Alt + Click) the selection. 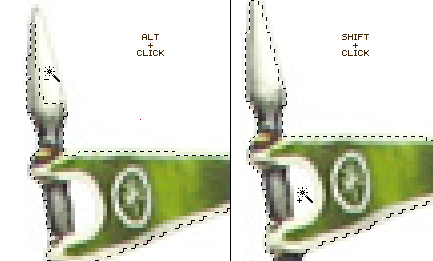
Instead of the shortcuts you can switch the mode in the option toolbar:
normal select mode:
Add the area clicked upon to the selection:
Subtract from selection:
This method is insufficient if white elements of the subject are in front of a white background like in this example. Then you are spoilt for choice: If you reduce the tolerance and select less of the background, a fine, bright lining will remain around the subject. If you increase the tolerance, parts of the subject get selected and will become invisible later on when you delete the background.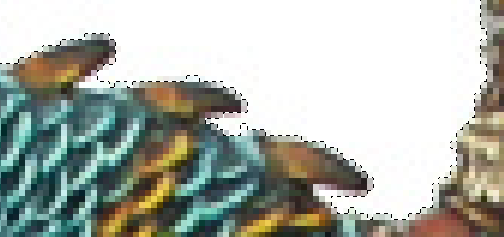
Of course, you can reduce the tolerance to 0 and select or deselect almost every single pixel. But then, you can just as well use the manual method. And therefore, a more elegant method exists.
Manual Selection
To make a selection manually, the pen tool is the most suitable tool. The path drawn with it can easily be changed into a selection later. 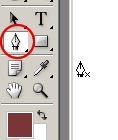
Make sure to work in path mode after selecting the pen. 
With the pen tool you can draw bezier curves. This method is very accurate and with a little practice it's quite fast as well.
You should zoom in on the subject to be able to draw the path precisely (e.g. to 600%). It's helpful to see the pixels with the naked eye. You can move the canvas any time by pressing and holding the space bar. The pointer changes to the hand and with a pressed down mouse button you can move the canvas without dropping the line you draw. After you moved the display detail to a new position you can simply continue to draw your path.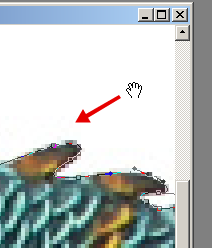
If you're familiar with bezier curves you can skip this part.
It's best to start with a spot where you need a hard angle in the path, like the mouth of the dragon here.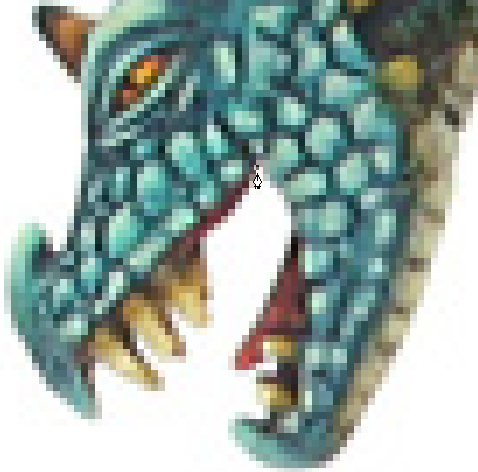
Now click and hold the mouse button at a point along the border of the subject in the middle of the intersection between the subject and the background. A tangent is shown. You can increase or decrease the radius of the curve by dragging the pointer.
A word on positioning: If you set the points closer to the backgound, the isolated subject will have a softer border because of the anti-aliasing which is preserved, but probably a small bright shining will be visible (especially if you choose a colored new background like in this example and not a gradient to white like some do). If you stick closer to the subject, the border could be unnaturally hard in the end. However: I'd prefer to stick to the object. There are means to soften the border but it's more time-consuming to eliminate a bright shimmer around the whole miniature.
If you set the point into a corner you just need to click once shortly. This way, no tangent will be generated and the path leads in a precise angle to the next point without a curve.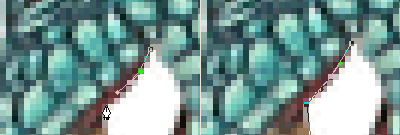
If you still need a tangent at that point later on to top the path off, you just need to click on the point while holding the Alt-key pressed down (the pointer changes like in the left picture) to add a new tangent.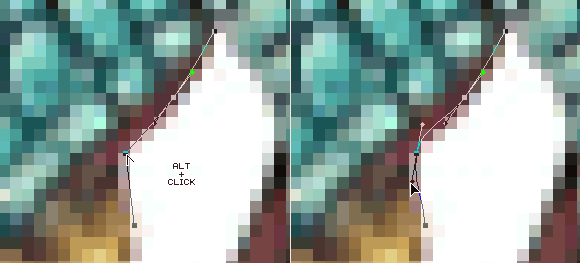
You might want to set the points before and behind a crook, since the straight lines give a good orientation for the direction of the path and with the length of the tangent you've got a more precise influence on the angle of the curve between the two straight lines. If the tangents of both anchor points run towards each other, you can change the angle of the curve in between by changing the length of the two tangents. The more both tangents draw near the more pointed the curve gets.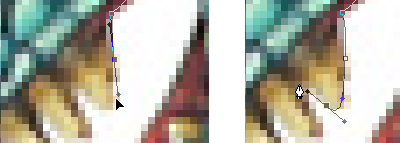
With a little practice it's really easy to draw Bezier curves. And - you can always change the path. If you hold the Ctrl-key the pointer changes to a white arrow and you can relocate every anchor point.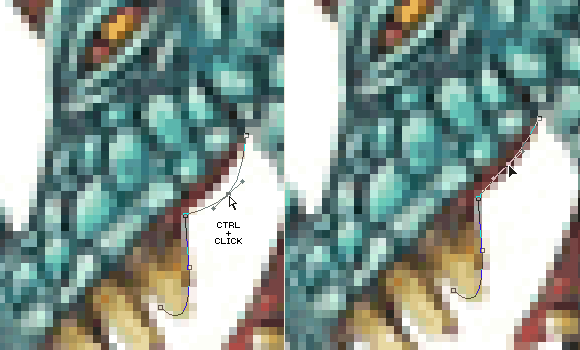
Even the radius of a curve can be readjusted the same way.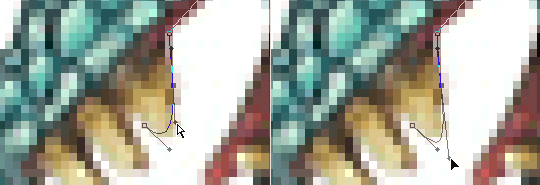
If you hit the del-key you delete the activated anchor point. That's usually the last one you set. That's handy if you set it off the mark. But be careful! If you hit the del-key twice you delete the whole path. After the last (activated) point has been deleted, the whole path is automatically activated (all anchor points are filled), not the previous point as you might think. So, if you hit the del-key a second time, the whole path will be deleted. Only the undo function (ctrl+z) or clicking on the last state of the history will restore the path.
After deleting the last anchor point or after dragging another one than the last to a new location you will have to pick up the path again to continue. Therefore, you have to click on the last anchor point of the path to activate it. If you move the pointer above an anchor point which can be activated to draw the path from that point on, the pointer changes and the symbol shown below appears. That's when you can click and activate the anchor point.
If you click on the line of the path itself, a new anchor point will be added at that very spot (see the "+" beside the pointer). 
A click on an existing anchor point (without holding the ctrl-key) deletes this point and the path will be straightened between the adjoined anchor points (see the "-" beside the pointer). 
That might look quite tricky at a first glance but you will get used to it. Bezier curves may behave strange for a beginner. But practice is all you need. Experiment with them some time and you will soon be very familiar with the clicking and dragging to draw perfect paths. And a hint for the beginner: Don't let go of the mouse button too quickly. As long as you hold it pressed, you've got the full control of the tangent and you can lengthen, shorten, or tilt it, and thus affect the form of the curve. Of course, you can do that as described above by holding the ctrl-key and clicking on the appropriate anchor point but you will always have to reactivate the last point to continue drawing.
A path has got a major advantage: You've got full control of the dividing line between subject and background, even if the background is turbulent or of a similar color than parts of the miniature - in contrast to the semiautomatic generated selections, which can be very frustrating if you try to select or deselect small areas with almost identical colors.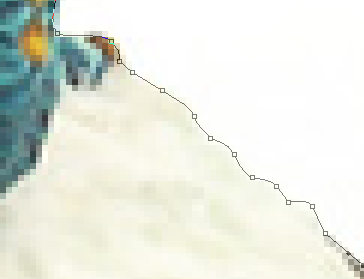
The result is promising: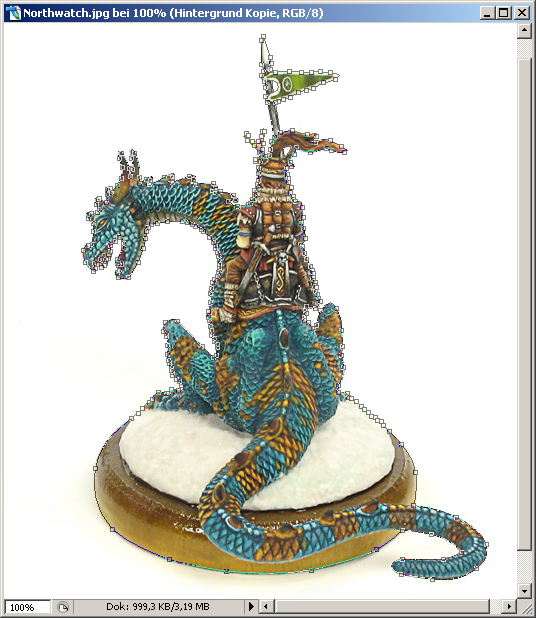
Eventually, you should save the path to reactivate it later as required. Switch to the "Paths" palette (usually behind the "Layers" palette), go to the menu and click on "Save Path".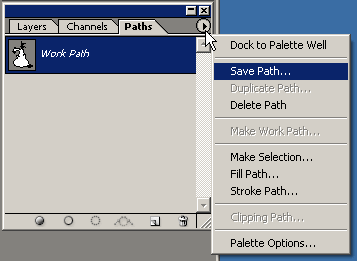
To turn the path into a selection now, just click in that very palette at the bottom on the button "Load path as a selection". This should result in a very accurate selection.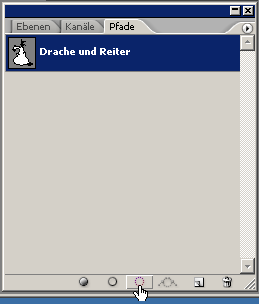
Well, after all this hassle, you should have a precise selection of the subject itself and this should look something like that: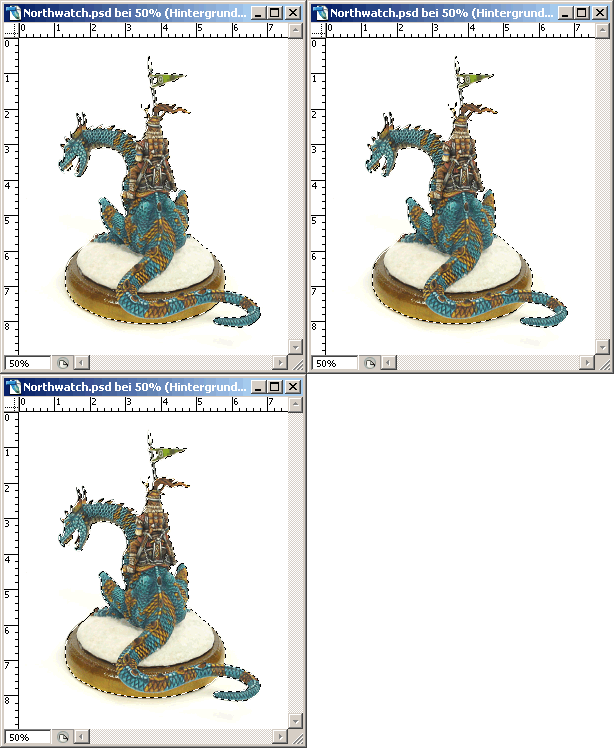
Isolation with or without magic
Isolation - quick&dirty
The easiest method to isolate the subject is the hotkey shift+ctrl+J. The selected area will be cut out and copied to a new layer. Just to make this very clear: This is not the best way and should be avoided altogether. If you isolate the subject with this method anyway, the selection should be very, very precise, because you should always remember: with this method all pixels outside of the selection will be erased from the layer irretrievably.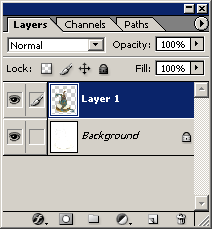
The picture still seems to be unchanged because the (white) background is still in its place. But now you can fill the background layer for example with a gradient and thus show the isolated object. By the way: If you press and hold the shift-key while dragging the line for the gradient this very line can only be dragged in angles of 45°. That way, a slightly shifted pointer tip doesn't have any influence on the angle of the gradient and it will always be straight.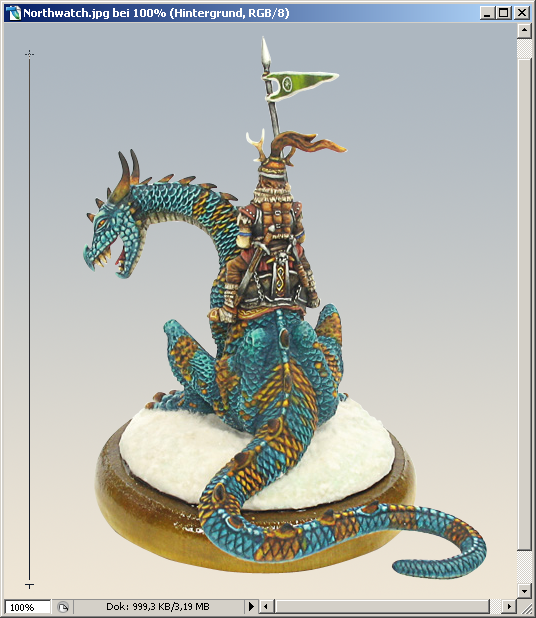
Alternatively, you can cut + paste the selected area onto any background.
The result and the disadvantage is the same: all the pixels which weren't selected are removed - and therewith any possibility of a later correction. This is particularly annoying if the selection wasn't that accurate after all and in the end some details of the subject are missing. Therefore, the second method should always be used because even a not-so-perfect selection can be corrected afterwards.
Isolation - non-destructive
In contrast to the selection, this time the more sophisticated method isn't even more time-consuming - at least not inevitably. The method of non-destructive isolation requires the subject not to be in the background layer since this layer is always locked in Photoshop (see the small lock symbol at the right of the layer) If the subject lies in the background layer (as it is usually if you use the picture from the digicam), you will have to duplicate the layer with the appropriate item in the layer palette menu. 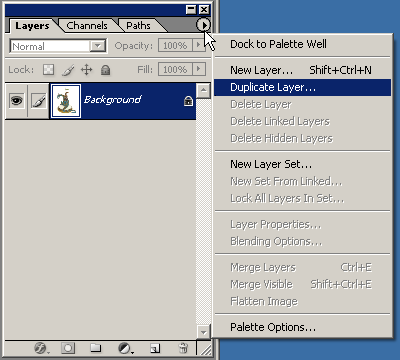
You can drag the background layer on the "New layer" icon at the bottom of the layer palette (second to the right besides the dustbin icon) as well. 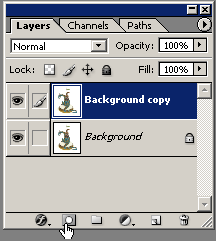
Then you change the current selection into a layer mask by clicking on the icon "Add layer mask" at the bottom of the layer palette.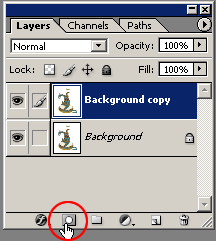
If you turn off the visibility of the background layer...
you can see the isolated subject.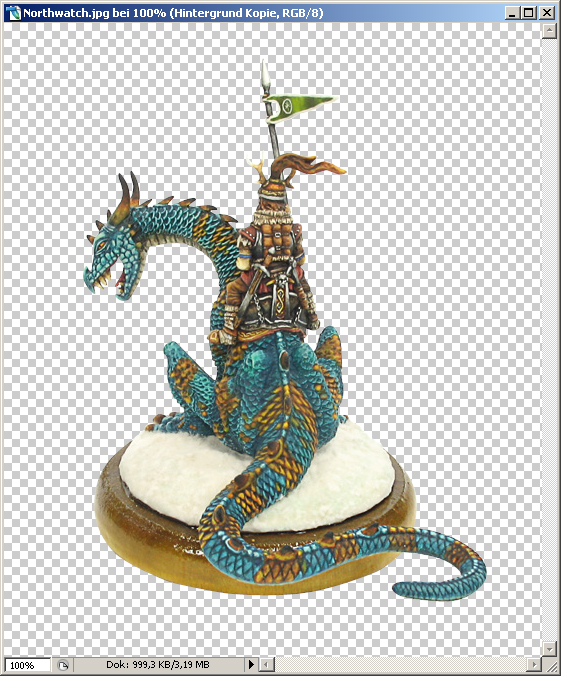
But why is this method superior to the popular cut&paste method? Well, the layer mask is just a second layer on the very image layer, which determines the transparency of every single pixel in 256 steps between completely invisible to 100% opaque, like the alpha channel in a 32-bit PNG-image does. 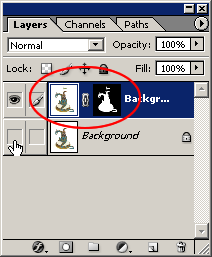
The layer mask is a black and white image which overlays the image layer. Everything which is black in the layer mask is transparent in the image. And that's important: all those pixels beneath the black areas of the layer mask are still there. They are not deleted but just invisible. Everything beneath the white parts is visible. So, to make any corrections all you have to do is make the layer mask black (for deleting parts) or white (to make them visible once again). Since the layer mask can be filled in greys there are even half-transparent pixels - great to soften the borders.
But the main advantage of course is that you can make parts visible once again which are "cut away" due to a inaccurate selection. You can fill those areas (after selecting them) with the paint bucket tool or use the brush. Make sure to have the layer mask selected (otherwise you might daub over the miniature).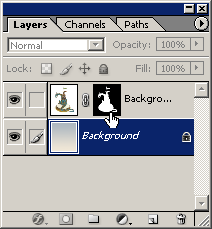
So it's most important to click on the thumbnail image of the black and white layer mask and not on the image layer or the layer name. You can easily check if you selected the layer mask by choosing a color. Only grey tones and black and white will be available in the color switcher. 
Choose the brush and paint straight ahead.
As if by magic the painted parts get visible. 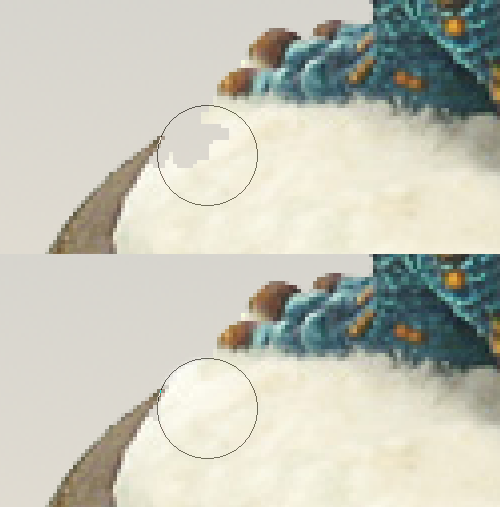
Go right ahead and do it spaciously, you can always improve the result later.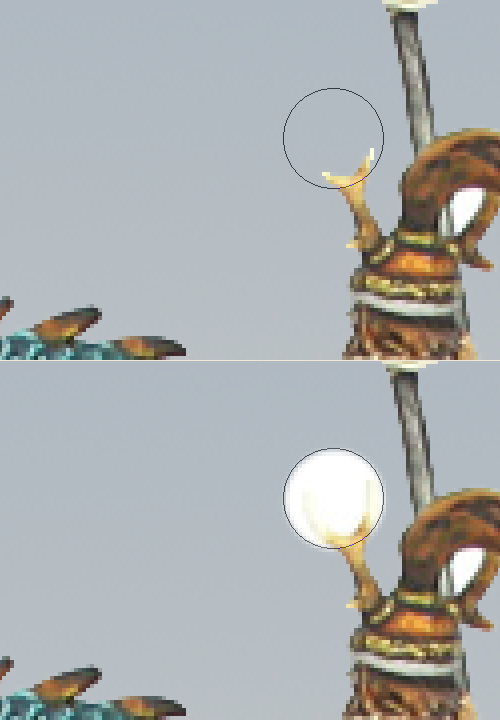
If you made too large an area visible just change to black, choose a smaller brush tip and make it transparent once again. There is no easier way to alter an isolation.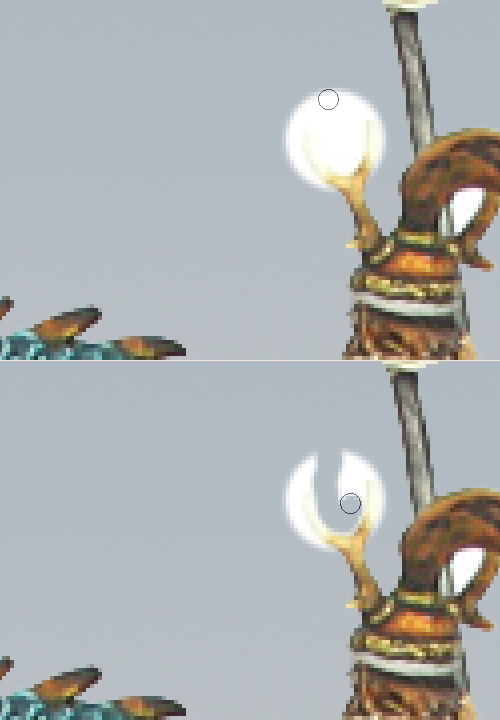
The result isn't half bad, even at the most tricky spots.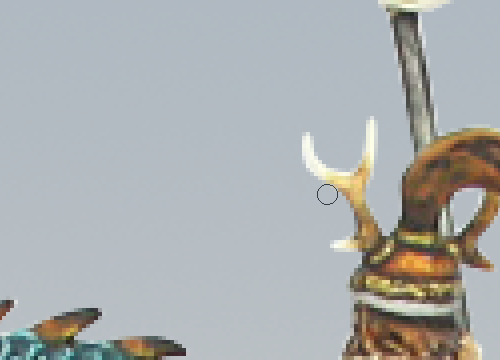
At the end, you will be awarded with a really good looking isolated figure.
By the way, I prefer to edit the pictures at 1.5 times to twice the size of the resulting size and after isolating the subject I reduce the image size to 50-70% ("Image" > "Image Size..."). This softens the borders and reduces any shining around the subjects should there be any single bright pixels left. But beware: The image size shouldn't be too large if you edit the picture. Because of the bicubic resampling of the the image lots of details get lost. Thus, it might have a contrary effect, if you edit a picture with the maximum resolution of your digicam. 6, 8, or 10 megapixel are a nice feature if you want to hang up a 16''x12'' print of your pictures on the wall. But if you want to upload a picture of 800x600 pixels on the web, a lot of detail has been eliminated by Photoshop. This flattened and softened result may be what you want because it also eliminates some irregular slaps of the paint on the mini or is even more authentic in regard of a comparison to how the human eye sees the miniature than a macro lense which magnifies dust particles of just a millimeter in size to a monster several inch large on a 19'' screen. But the isolation of subjects shouldn't be made at an image of too high a resolution since the 3 pixels which constitute the dividing line between subject and background on a sharp image together with the 12 pixels to the left and to the right will be reduced to just 2 pixels. It's obvious that this can't have a favorable effect on fine, isolated details.
More non-destructive image manipulation
This is just a start of the rich opportunities of non-destructive editing. You can also make color correction with non-destructive methods. With adjustment layers (icon "Create new fill or adjustment layer" of the layer palette or "Layer" > "New Adjustment Layer") you've got all the means at hand you need for modifying color, brightness, contrast, saturation, hue etc. You can even sharpen or soften the picture.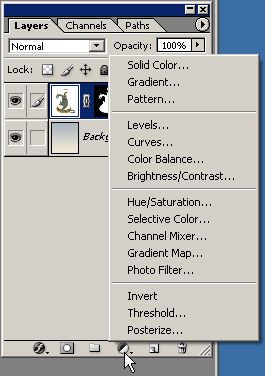
All adjustments you make with a separate adjustment layer won't be rendered into the image but applied as an overlay layer which can be turned on and off easily. You can test and compare lots of different adjustments and combinations easily without changing the image data and thus get back to the original by just one click. But you will have to combine the adjustment layer with the image layer below using a so-called clipping mask (see Photoshop Help "Layers" -> "Masking Layers" -> "Create Clipping Mask") to avoid assigning the adjustments to all the layers below the adjustment layer (including the background).
For more information on non-destructive editing with adjustment layers take a look at this excellent tutorial: http://www.lunacore.com/photoshop/tutorials/tut013.htm
I hope you enjoyed this little Photoshop tutorial.
If you've got any questions or comments, don't hesitate to contact Ralph: http://www.miniaturenland.com/en/impressum.html.
